
Table of Contents
When a customer walks into your cafe, they are looking for a clear, enticing, and simple experience. They want to see beautiful photos of your new seasonal latte, easily spot the lunch specials, and not have to squint to read your prices. A static menu is a major missed opportunity. It’s the era of dynamic menu boards.
If this sounds technically complex or expensive, it’s important to know that modern solutions have made it straightforward and affordable. You don’t need to be a tech wizard. If you can manage a simple playlist, you can create a beautiful, professional, and profitable digital menu system.
This guide provides a clear path to creating dynamic menu boards for your cafe using a simple, powerful tool: Kitcast.
What Exactly Is a Dynamic Menu Board?

Think of a dynamic menu board as a smart, digital version of your old menu. Instead of being a fixed, printed sign, it’s a living, breathing display on a TV screen.
The “dynamic” in the name means that your menu can:
- Change automatically: Show your breakfast menu from 7 AM to 11 AM, then seamlessly switch to your lunch menu without any manual effort.
- Showcase specials: Run a “Happy Hour” promotion every weekday from 4 PM to 6 PM, or highlight a “Daily Special” that only appears on Tuesdays.
- Highlight items: Use eye-catching videos of your espresso pull or vibrant photos of your freshly baked pastries to drive sales of high-margin items.
- Update instantly: Sold out of avocado toast? Remove it from the menu in 10 seconds from your phone or laptop. No printer, chalk, or apologies to customers needed.
This isn’t just about looking modern. It’s about selling more. A well-designed digital menu can increase sales by up to 30%. It grabs attention, makes your food look irresistible, and helps customers make decisions faster.
How to Create Your Dynamic Menu in 4 Simple Steps with Kitcast

Let’s walk through the process. Kitcast was designed to turn any TV into a powerful digital sign in minutes, regardless of your tech background. All you need is a TV and a small, affordable media player.
Step 1: Get Your Hardware Ready (The Easy Part)
This is the only “physical” part, and it takes about five minutes.
- Select a TV: Any standard HD or 4K TV is perfect for the job.
- Choose Your Media Player: Kitcast offers incredible flexibility. It runs perfectly on the most popular and reliable platforms:
- An Apple TV (4th gen or newer)
- An Amazon Fire TV Stick (4K or 4K Max recommended for best performance)
- Any Android TV device (this includes smart TVs with Android TV built-in or an external Android TV box)
- Plug It In: Connect your chosen media player to your TV’s HDMI port and connect it to your cafe’s Wi-Fi. That’s it. The hardware setup is complete.
Step 2: Design Your Menu (The Fun Part)
This is where your brand comes to life. Log into your Kitcast dashboard on your computer or tablet – no design degree required.
- Start with a Template: Kitcast has a library of over 500+ professional templates. Just pick a menu board design that fits your cafe’s aesthetic.
- Use the AI Builder: For an even faster start, try the new AI tool. Type a simple prompt like, “create a cozy coffee shop menu with a video of steaming coffee in the background,” and it will generate a design for you.
- Add Your Content: Type in your menu items, prices, and descriptions. Upload your own photos and videos, or use the built-in library of high-quality stock media. Drag and drop your logo and change the colors to match your brand.
Step 3: Make It “Dynamic” with Scheduling

This is the magic. You don’t want to show your croissant special at 6 PM. In Kitcast, you’ll use the simple “Scheduling” feature.
- Create Your Playlists: Think of a playlist as one “menu.” You might make a “Breakfast Menu” playlist, a “Lunch Menu” playlist, and a “Weekend Specials” playlist.
- Set the Time: Go to the calendar scheduler. Tell your “Breakfast Menu” to play every day from 7:00 AM to 11:00 AM.
- Set the “Lunch Menu” to play from 11:01 AM to 4:00 PM.
That’s it. Your menus will now switch automatically, right on time, every single day. You never have to think about it again.
Step 4: Add Value with Widgets and Zoning
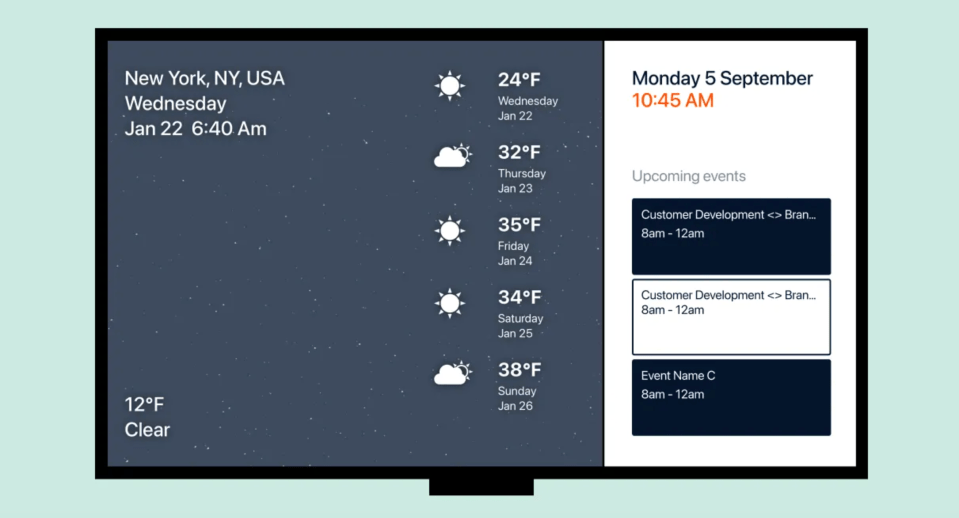
A dynamic menu isn’t just a menu. With Kitcast’s “Zoning” feature, you can split your screen to show other compelling content.
While your menu is displayed on the left side of the screen, you can use the right side to add:
- An Instagram feed: Automatically show off your latest beautiful food photos.
- A “Tasty” video: Play quick, fun recipe videos to entertain customers.
- The weather: A simple, helpful touch for your customers as they plan their day.
- Reviews: Display your glowing 5-star Google reviews to build social proof.
This keeps customers engaged while they wait and makes your cafe feel connected and modern. For more ideas, read our guide on the 10 best practices for digital menu boards.
You Are in Complete Control
The most powerful aspect of this system is that you can control everything from anywhere.
Imagine you’re at the farmer’s market and find amazing, fresh strawberries. You decide to run a “Fresh Strawberry Tart” special.
Just pull out your phone, open the Kitcast dashboard, add the special to your menu, and hit “Publish.” By the time you get back to the cafe, your new special is already on the screen, tempting customers.
It’s time to stop printing and start impressing. Creating a dynamic menu board is one of the easiest and most effective upgrades you can make for your cafe. It puts you in complete control, saves you time and money, and creates a better experience that will keep customers coming back.
Guide to Digital Signage Zoning: Make The Most Of Your Screens
10 Best Digital Menu Board Software Solutions in 2026 (Ranked)